Create: Shokugeki No Soma (Food Wars!) Knife Tutorial
 Hi everyone! Today I will be showing you the first three steps of how to make a Santoku model knife. The knife I specifically will be modeling a Japanese Santoku cooking knife. This method can be used with any knife, not just the Santoku!
Materials you will need:
- Poster board
- Hot glue and a hot glue gun
- A pencil for sketching the shape of your knife
- Ruler (optional)
- Box cutter
- Fast Mache™ or some other kind of fast drying sculpting mache (available at Michael’s)
- Lightweight spackle (brand does not matter)
- Sandpaper
- Paints of your choice
I absolutely love making props and working on costumes, and I hope you will too! Now that we have covered what you will need let’s start going through the steps. This time I will be talking about making the pieces for the base you will later turn into the knife. In the next installment, we will talk about how to strengthen the knife and to make it more realistic as well as painting your model. Without further ado, let’s get started!
Step One: Create your knife outline on poster board
 Step one is to take your poster board and trace onto it the shape of the knife you plan on making. When making the outline for the knife, you can look up the measurements for a standard Santoku knife and used that. You may also, and this is a little more dangerous, take a Santoku knife and mark where you need each point on your knife to be on your poster board. I then traced a silhouette of my knife onto the poster board.
To make the handle, I sketched a circle with a diameter that matched the end of my knife. From there, I made a square using the circumference of the circle as a guide and the length of the handle. So, let’s say that my knife has a handle that is 1 inch around. Your radius would then be a ½ inch. Multiply this by Pi (the number not the food!) Google has a handy tool where you can do that here. Then you have the height of your rectangle! From there, use your Santoku outline to find out your rectangle width.
Step Two: Cut it out with your box cutter
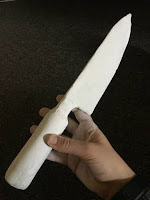
 Very carefully, use your box cutter to slowly start working your way through the poster board using the outline you made as a guide. You may have to run through the poster board a couple of time to get a clean cut, this is completely normal. Do not try to cut all the way through on the first try, your edges will come out bumpy. Once you have cut out all your shapes, get your handle piece. On the handle piece, make very shallow cuts along the whole shape in the direction you want to wrap the handle. You should cut through one layer of paper and a little into the foam underneath. Do not cut all the way through! You will want to leave the paper intact. In order to make it bend like in my photo, gently bend your cuts until you can effectively make a circle with your piece.
Step Three: Hot glue everything together
Using your hot glue gun, glue all the pieces together. Start by wrapping the handle piece around the handle, then put the circle on the end to seal it all together. I also glued some small squares for support onto the base of the blade between the handle and the blade because it was flimsy. Later I ended up adding toothpicks on top of these support squares. I would recommend putting them on the blade before the support squares so that you can hide them better later. Learn from my mistakes and add those during this step! It will make your blade look better once we are done.

Thinly lay on the spackle until you have an even coating on your model. For my model, I did 4 different sections of the coating. First, do one side of the blade, followed by the handle, then repeat the process on the other side. This will prevent the material from sticking and coming off by letting it completely dry before you turn over the model to work on the other side.
 To paint the silver of the blade, I wrapped the blade in paper towels and used painters tape to make the edge. Take your time to make sure the tape is laid how you want it to be because it will be hard to fix your paint and make it look crisp later. I did not touch up the silver after. For the silver, I used a chrome spray-paint that can be found at most hardware stores. The reason why I recommend you use spray-paint for this step is that I believe chrome spray paint has a great reflective quality and makes the prop more believable. For the handle, I used a mix of brown and yellow, then tried to make it look like wood grain by leaving some streaks in the paint.

Then you are done! I hope you enjoy your new prop!
Let me know if you guys have any questions below. I would love to see pictures of how your work came out as well. Good luck, and have fun!
Step Four: Start coating your blade with Fast Mache
With your model glued together, it is now time to fast mache your blade. Fast mache is a kind of clay that has a clumpy consistency. You will want to do a 1:1 ratio of water to fast mache mix then coat your blade completely. You will want to keep the layers thin, but this layer will help the spackle stick better. I applied two coats of fast mache, just until the model was completely covered. Between coats, you will want to let your model dry for at least 24 hours. After the two coats are complete you can start spackling.
Step Five: Start using spackle

Thinly lay on the spackle until you have an even coating on your model. For my model, I did 4 different sections of the coating. First, do one side of the blade, followed by the handle, then repeat the process on the other side. This will prevent the material from sticking and coming off by letting it completely dry before you turn over the model to work on the other side.
Step Six: Sand down the model
After the spackle has dried, start sanding the blade down. You may want a mask for this part because spackle becomes a very fine powder when sanded. If your blade has a lot of excess spackle, start with a 60-80 grit sandpaper. Once you sand down the blade to a little thicker than you want you can move up to a higher grit sandpaper. Make sure to at leave a layer to keep the model strong and to prevent breaking. When you want to start smoothing the prop, move to a 140-160 grit sandpaper. Continue to smooth out the spackle until you have a finish you like. I also used a 210-grit sandpaper just to make the blade look flawless.Step Seven: Painting
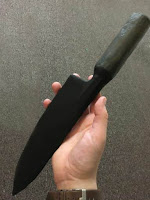
We will now start painting. I start by completely coating my model with a satin black acrylic paint. You can also use spray paint, but I prefer acrylic because I feel it gives me more control. Spackle will soak up a lot of the paint so you will want to do at least two coats. It is also very common for air pockets in the spackle to look like small specks when you are painting. To fix this, simply work the paint into the holes.
 To paint the silver of the blade, I wrapped the blade in paper towels and used painters tape to make the edge. Take your time to make sure the tape is laid how you want it to be because it will be hard to fix your paint and make it look crisp later. I did not touch up the silver after. For the silver, I used a chrome spray-paint that can be found at most hardware stores. The reason why I recommend you use spray-paint for this step is that I believe chrome spray paint has a great reflective quality and makes the prop more believable. For the handle, I used a mix of brown and yellow, then tried to make it look like wood grain by leaving some streaks in the paint.
Then you are done! I hope you enjoy your new prop!
Let me know if you guys have any questions below. I would love to see pictures of how your work came out as well. Good luck, and have fun!
If you want to see some helpful videos on this subject, this YouTube video series has great tutorials and uses a lot of the same tools and methods we will be using, except for larger scale props.
Comments
Post a Comment